Step Guide To Add Product
Create New Product
- Login via https://partner.doodel.com.au/
-
Go to Products -> Product Listing

- Click on Add Product
- Fields and explanations:
- Choose Product: defaulted to Normal Product (leave it as is)
- Product Name: enter the name for the product. Find something catchy and interesting
- Product Type: they have been pre-defined. If a product type that you would like to set is not listed, please contact Doodel staff
- Description: it could include what the product contains and consists such as it comes with 4 skewers. If it is a set menu, list the items so customers know what to expect.
-
Product Tags:
-
Enter which day the product is available for. If it is for Monday only, type Monday (case sensitive) then Enter key until it becomes an entry highlighted in green like in the screen shot below. If it is for multiple days, type Monday -> enter key -> Tuesday -> enter key and so forth. It is important to have the day not to be misspelled and please note that it is case sensitive.

- Enter a number which represents how many hours prior you would like to stop receiving order. For example, if the product is to be delivered Monday 04 Jan 2021 and the Pre-Order to be closed 2 days prior (ie. last order is Sat 02 Jan 2021 at 11.59 PM, please add 48 into the Product Tags like the screenshot below. It means the Pre-Order will automatically close for this week and reopen for the next Monday 11 Jan 2021 (for a weekly special product that is not for sale for the next week, please refer to the next step in relation to setting Expiry Date automatically).

- For weekly special product that is not for sale for the next week, please write the key word: oneoff in the product tag. Because the product is only available for certain days, make sure ALL the days are entered in the product tag section. Follow the exact format of “day DD MM YYYY” (eg. Wed 07 Apr 2021 ). The preorder closing number (ii) is also required so that order can be closed automatically.

-
If you wish to make a weekly special product available every week then delete ALL the dates and the oneoff tag, then follow step II.
-
Enter which day the product is available for. If it is for Monday only, type Monday (case sensitive) then Enter key until it becomes an entry highlighted in green like in the screen shot below. If it is for multiple days, type Monday -> enter key -> Tuesday -> enter key and so forth. It is important to have the day not to be misspelled and please note that it is case sensitive.
-
The following section can be left blank, however, please ensure Require Shipping box is checked

- Please enter a value in the Price box. If you are offering discount, please specify the original price in the Compare At Price box and enter the discounted price in the Price box. Please ensure Change Taxes on This Product is ticked.

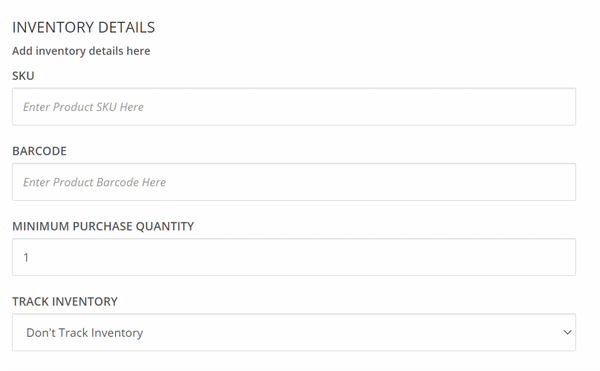
- The Inventory Detail section allows you to set minimum purchase quantity and set max quantity to be sold.
-
The following step is required if the product comes in multiple variants such as size. Click on Add Variant.
Let’s say it is for product with option of 500 ml and 1 litre and they are different pricing. Type Size in the Option Name and then 500 ml followed by comma until it becomes a green box and then type 1 litre followed by comma again.Continue to the next section. You will be able to specify the pricing once the product is saved.
- Add product image in the following section

-
Leave Collection section as is

- Click on Save Change button.
-
Now go back to Variants section to update the pricing for the Size variant
Click on the 3 dots and click Edit to enter the pricing.

- You are now done. Congratulations!